Maintaining oral hygiene with braces or other orthodontic appliances can be challenging. Plaque, food particles, and bacteria tend to accumulate around brackets, wires, and other components, making thorough cleaning essential to prevent cavities, gum disease, and other dental issues. One of the most effective tools for maintaining oral hygiene during orthodontic treatment is the Waterpik Orthodontic Tip. This specialized tip is designed to clean around braces, brackets, and wires, helping patients maintain a healthy smile throughout their orthodontic journey.
What Is Waterpik Orthodontic Tip?
The Waterpik Orthodontic Tip is a unique attachment designed to fit Waterpik Water Flossers, which use a combination of water pressure and pulsations to clean between teeth and below the gumline. Unlike traditional flossing, which can be difficult with braces, the Waterpik Orthodontic Tip makes it easier to remove plaque and debris around orthodontic appliances.
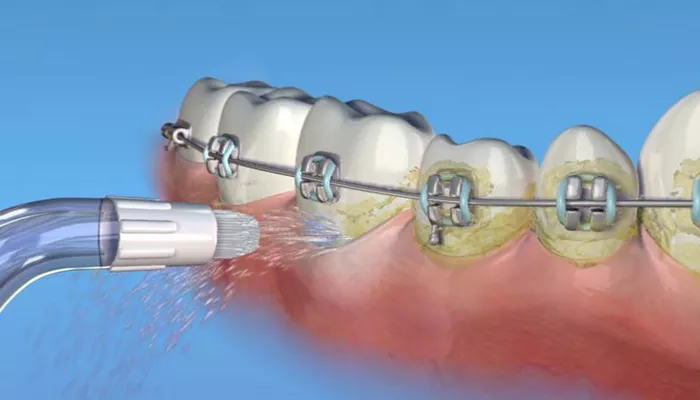
The orthodontic tip features a tapered brush at the end, which helps dislodge food particles and plaque from around brackets and wires. The powerful water jet then flushes out the loosened debris, providing a more thorough cleaning than brushing or manual flossing alone.
Benefits of Using The Waterpik Orthodontic Tip
Using the Waterpik Orthodontic Tip offers several advantages for patients with braces or other orthodontic devices:
Improved Plaque Removal: The orthodontic tip is clinically proven to remove up to three times more plaque around braces than traditional brushing and flossing.
Easier Access: The flexible tip and brush make it easier to reach difficult areas around brackets, wires, and other orthodontic appliances, ensuring a more comprehensive clean.
Gum Health: The pulsating water jet massages and stimulates the gums, improving circulation and promoting healthier gum tissue.
Prevention of Decalcification: By effectively removing plaque, the Waterpik Orthodontic Tip helps prevent decalcification (white spots on teeth) that can occur around braces.
SEE ALSO: How Much Are Orthodontic Retainers
Convenience: Using the Waterpik is quick and easy, making it more likely that patients will maintain a consistent oral hygiene routine.
Step-by-Step Guide to Using The Waterpik Orthodontic Tip
Using the Waterpik Orthodontic Tip is straightforward, but following the correct technique is essential to ensure optimal results. Here’s a step-by-step guide:
1. Prepare Your Water Flosser
Start by filling the reservoir of your Waterpik Water Flosser with lukewarm water. Cold water can be uncomfortable, and hot water might damage the unit. If you prefer, you can add a small amount of mouthwash to the water for an added antibacterial effect and a refreshing sensation.
After filling the reservoir, attach the Orthodontic Tip to the handle of the Waterpik unit. Make sure it clicks into place securely.
2. Adjust the Pressure Setting
The Waterpik Water Flosser typically has multiple pressure settings, allowing you to customize the intensity of the water jet. For first-time users, it’s advisable to start with a lower pressure setting and gradually increase it as you become more comfortable. Higher pressure can be more effective at removing debris but might feel too intense initially.
3. Position the Tip Correctly
Lean over the sink to avoid splashing water everywhere. Place the tip in your mouth before turning on the unit. Position the orthodontic tip at a 90-degree angle to your gumline, starting at the back teeth. The brush should be gently pressed against the brackets or orthodontic appliance.
4. Begin Cleaning
Turn on the Waterpik and guide the tip along the gumline and around the brackets. Move the tip slowly along the teeth, making sure to spend a few seconds on each tooth to thoroughly clean around the brackets and wires. The combination of the water jet and the brush helps dislodge and flush out food particles and plaque.
5. Focus on Hard-to-Reach Areas
Pay special attention to hard-to-reach areas, such as the molars and the back of your mouth, where plaque and food particles tend to accumulate. Also, ensure you clean the spaces between the teeth and under the wires.
6. Clean the Tongue and Cheeks
After thoroughly cleaning the teeth and gums, you can also use the Waterpik to clean your tongue and the inside of your cheeks. This helps remove additional bacteria and leaves your mouth feeling fresher.
7. Rinse and Repeat
Once you’ve finished cleaning with the Waterpik, rinse your mouth with water or mouthwash. If necessary, refill the reservoir and repeat the process until you feel your mouth is clean.
8. Clean the Waterpik Unit
After each use, it’s important to clean the Waterpik unit. Empty the reservoir, detach the orthodontic tip, and rinse both parts thoroughly with warm water. This helps prevent the buildup of bacteria and ensures the unit remains in good working condition.
Incorporating The Waterpik Orthodontic Tip Into Your Oral Hygiene Routine
For best results, use the Waterpik Orthodontic Tip as part of your daily oral hygiene routine. Most orthodontists recommend using it once or twice a day, ideally after meals, to remove food particles and plaque that can accumulate around braces. Combining the Waterpik with regular brushing and traditional flossing (if possible) will help you maintain optimal oral health throughout your orthodontic treatment.
Conclusion
The Waterpik Orthodontic Tip is an invaluable tool for maintaining oral hygiene during orthodontic treatment. Its ability to clean around braces, wires, and other orthodontic appliances ensures that patients can keep their teeth and gums healthy throughout the treatment process. By following the proper technique and incorporating the Waterpik into your daily routine, you can enjoy a cleaner, healthier smile, free from the common issues associated with braces.

