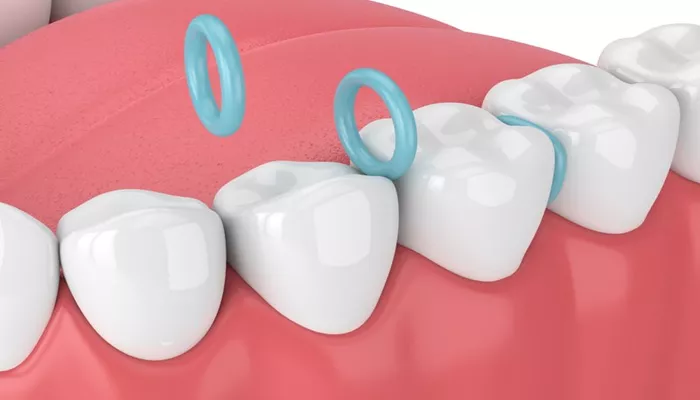
Orthodontic separators, commonly referred to as spacers, play a crucial role in the orthodontic treatment process. They are small, elastic devices placed between the back teeth to create space for the placement of molar bands. This article will provide a comprehensive guide on how to place orthodontic separators effectively, ensuring that both practitioners and patients understand the process and its importance.
The use of separators is essential in cases where teeth are crowded or when additional space is required for orthodontic appliances. By gently pushing the teeth apart, separators facilitate the proper seating of bands, which are necessary for effective orthodontic treatment.
What Are Orthodontic Separators?
Orthodontic separators are typically made from elastic materials and come in various colors, such as blue or gray. They are designed to fit snugly between the teeth and exert gentle pressure to create space.
The two main types of separators include:
Elastic Separators: These are the most common type and are made from flexible rubber. They are usually left in place for about one to two weeks.
Metal Springs: These are more rigid and can be left in place for a shorter duration, typically two to three days.
The choice between elastic and metal separators depends on the specific needs of the patient and the orthodontist’s preference.
SEE ALSO: When Is Orthodontic Staff Appreciation Week 2024
Instruments And Materials Needed
Before placing orthodontic separators, it is essential to gather all necessary instruments and materials. The following tools are commonly used:
Elastic Separating Plier: For handling and placing elastic separators.
Jarabak Plier: Useful for placing metal springs.
Safety Knob Separators: These can be used for specific cases where additional security is needed.
Floss: To assist in cleaning around the separator area.
Brass or Niti Separating Wire: Sometimes used in conjunction with other types of separators.
Having these tools ready will streamline the placement process and enhance patient comfort.
Step-by-Step Guide to Placing Orthodontic Separators
Step 1: Patient Preparation
Before beginning the procedure, it’s essential to prepare the patient:
Explain the Procedure: Ensure that the patient understands what will happen and why separators are necessary.
Assess Oral Hygiene: Check that the patient’s teeth are clean. If necessary, perform a quick cleaning to remove any plaque or debris.
Step 2: Selecting the Separator
Choose the appropriate type of separator based on the individual case:
For most patients, elastic separators will suffice.
If additional space is needed quickly, consider using metal springs.
Step 3: Lubrication
To facilitate easier placement:
Use a lubricant such as fluoride gel or saliva (not your own) on the separator. This helps it slide into place without causing discomfort.
Step 4: Placement of Elastic Separators
Using Elastic Separating Pliers:
Pull an elastic separator from its container using elastic separating pliers.
Ensure you have a firm grip but avoid squeezing too tightly to prevent damage to the separator.
Inserting the Separator:
Position the separator between the two teeth where space is required.
Gently push it into place using the pliers until it feels secure but not overly tight.
Check Placement:
Confirm that the separator is correctly positioned and not causing excessive discomfort to the patient.
It should feel snug but not painful.
Step 5: Placement of Metal Springs (if applicable)
Using Jarabak Pliers:
Select a metal spring separator.
With jarabak pliers, grasp one end of the spring and gently insert it between the designated teeth.
Adjusting for Comfort:
Ensure that both ends of the spring are seated properly against each tooth.
Adjust as necessary to avoid any sharp edges that could irritate gum tissue.
Step 6: Post-Placement Instructions
After placing the separators, provide clear instructions to the patient:
Avoid Flossing: Instruct them not to floss around the separator area as this could dislodge it.
Dietary Restrictions: Advise against sticky foods like gum or candy that may pull on or displace separators.
Monitoring for Discomfort: Inform them that some soreness may occur as their teeth adjust; recommend over-the-counter pain relief if needed.
Step 7: Follow-Up Care
Schedule a follow-up appointment to check on the status of the separators:
Ensure they remain in place for their intended duration (1-2 weeks for elastics; 2-3 days for metal springs).
If any separator falls out before this time, instruct patients to contact your office for replacement.
Common Challenges And Solutions
Placing orthodontic separators can sometimes present challenges. Here are common issues along with solutions:
Issue 1: Difficulty Seating Separators
If a separator does not seat easily:
Solution: Apply more lubricant or reposition using pliers while ensuring not to apply excessive force that could harm surrounding tissues.
Issue 2: Patient Discomfort
Some patients may experience discomfort during placement:
Solution: Reassure them that some pressure is normal but should not cause pain. Adjusting the position might alleviate discomfort.
Issue 3: Separator Loss
If a separator falls out prematurely:
Solution: Advise patients to refrain from eating sticky foods and contact your office immediately for replacement.
Conclusion
Placing orthodontic separators is a vital step in preparing patients for further orthodontic treatment. By following these detailed steps—preparing patients, selecting appropriate materials, and providing post-placement care—orthodontists can ensure effective treatment outcomes with minimal discomfort.
Related topics:

